Does your pre-vacation ritual look anything like mine used to?
A dozen browser tabs open with “best cafes.” A camera roll filled with screenshots of restaurant recommendations. A notes app with a jumble of addresses and museum names.
It left me feeling more stressed than excited. But then I found a solution. It was simple, free, and hiding in plain sight inside a tool I already used every single day: Google Maps.
But I’m not just talking about getting directions. This helpful trick I use before every vacation is creating my own personal, interactive travel map for every single trip.
It’s so effective that every time I’ve shared a map with friends, they’ve been amazed at how useful it is.
Contents
Building Your Ultimate Travel Blueprint: A Step-by-Step Guide
This method serves two incredible purposes that tackle the biggest travel planning headaches.
First, it turns all that scattered research into a clear, visual master plan. You can see exactly where everything is, helping you pick the perfect neighborhood for your hotel and build daily itineraries that actually make sense.
Second, it becomes your in-pocket guide once you arrive. You just pull up the map on your phone, see all your pre-vetted spots nearby, and get instant directions. It eliminates that “what should we do now?” feeling.
Ready to build your own? It’s easier than you think. While you can view the map on any device, the setup is much, much easier on a computer. The web interface gives you more space and better tools to work with.
Getting Started on Your Desktop
First, head directly to Google’s special tool for this: Google My Maps. You can find it at google.com/mymaps. Make sure you’re signed into the Google account you use on your phone.
Once you’re there, click the big red button that says “+ Create a New Map.”

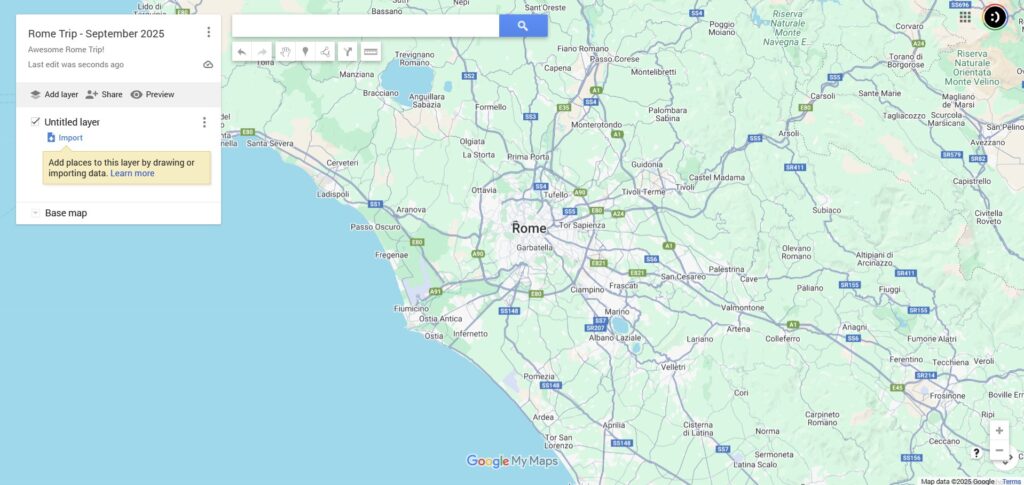
The very first thing you should do is give your map a name. Click where it says “Untitled map” at the top of the left-hand panel.
Name it something clear and useful, like “Rome Trip – September 2025.” You can add a description, too!
Adding Your Points of Interest
Now for the fun part: populating your map. This is where you take all those random notes and screenshots and give them a home. There are a few ways to do this.
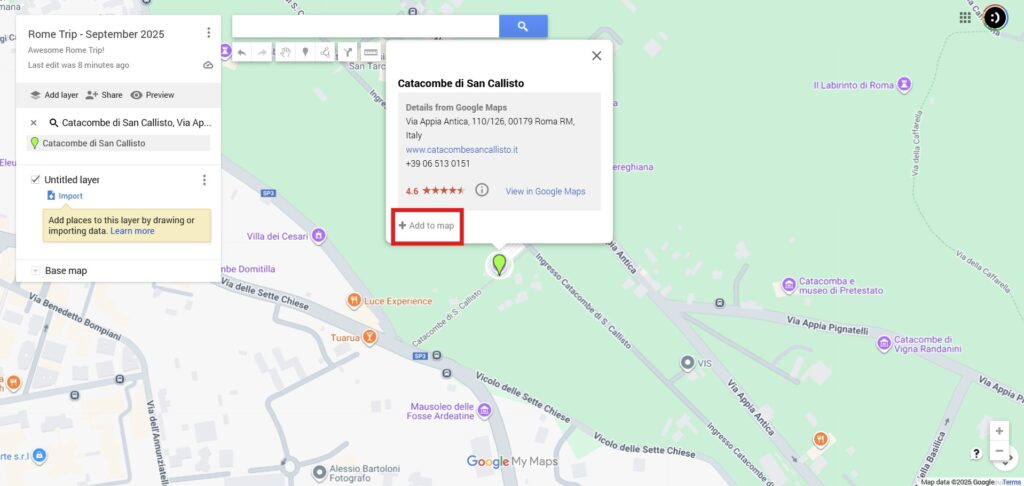
1. The Search Bar: This is the most common method. Simply type the name of a landmark, museum, or restaurant into the search bar at the top. When it appears on the map, a little info box will pop up. Just click the “+ Add to map” link, and it’s saved.
2. The Manual Pin Drop: What about a spot that doesn’t have an official address? Maybe it’s a specific viewpoint on a scenic drive or a cool piece of street art you saw on a blog. No problem. Click the “Add marker” icon (it looks like a little pin) below the search bar. Then, click anywhere on the map to drop your pin. You can name it whatever you want.

Pro-Level Timesaver: Import Locations in Bulk
If you’re a serious planner with a long list of places in a spreadsheet, this tip will blow your mind. Instead of adding dozens of pins one by one, you can import them all at once.
In the left-hand panel, click the “Import” link under your first layer. You can upload a CSV file or even connect directly to a Google Sheet.
My Maps will then ask you to identify which columns in your spreadsheet contain the location information (like an address or latitude/longitude coordinates) and which column has the name for each pin. A few clicks, and your entire list of research is instantly plotted on your map.
It’s an absolute game-changer for efficient vacation planning!
Organizing and Customizing Your Map
Just adding pins is a great start, but the real magic happens when you organize them. This is how you turn a collection of dots into a coherent, easy-to-use plan.
Your Secret Weapon for Organization: Using Layers
Think of layers as folders for your map pins. You can create up to 10 layers on a single map, which is perfect for categorizing your points of interest.
To create a new one, just click “Add layer” in the left panel. You can rename each layer by clicking on its title (e.g., “Untitled Layer”).
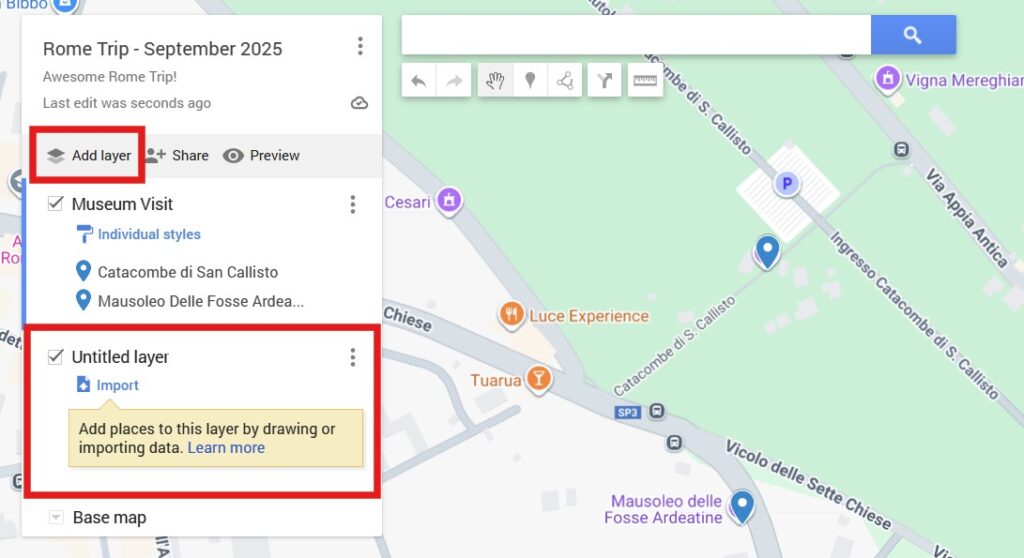
Crucial Tip: Before you add a new pin, always make sure you’ve selected the correct layer. The active layer will have a blue bar next to it. It’s a small detail that saves a lot of headaches later!
Strategic Layering for Your Vacation Planning Style
How you use layers depends entirely on your travel style. There’s no single right way, but here are a few strategies I’ve found incredibly effective.
Travel Style
Recommended Layer Strategy
Pros
Cons
The Meticulous Planner
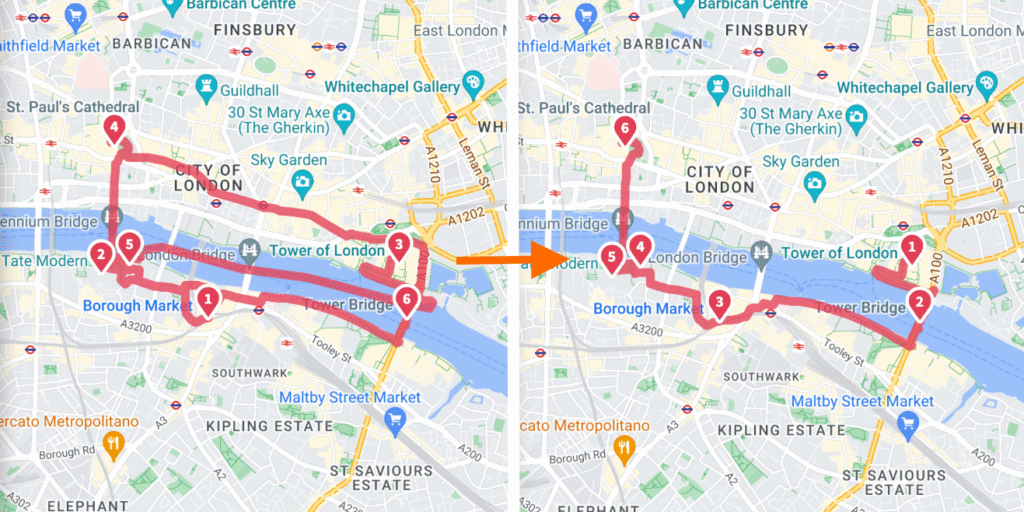
Organize by Day (e.g., “Day 1,” “Day 2”)
Excellent for building a logical, time-efficient itinerary. Easy to see if your daily plan is geographically feasible.
Can feel rigid; less flexible if plans change.
The Spontaneous Explorer
Organize by Category (e.g., “Food,” “Sights”)
Maximum flexibility. Allows for on-the-fly decisions based on what’s nearby. Great for discovering hidden gems.
Requires more in-the-moment decision-making. Can lead to inefficient travel paths if not careful.
The Family Organizer
Hybrid: Categories within Days
Balances structure with the need to categorize activities. Everyone can see the plan and their interests represented.
Can become visually complex. Requires disciplined use of both layers and individual pin styles.
The Road Tripper
Organize by Stop/Region (e.g., “Day 1-2: Coastal Drive”)
Perfect for multi-destination journeys. Keeps each leg of the trip separate and organized.
The 10-layer limit can be a challenge for very long trips.
Making Your Map Your Own
Customizing your pins makes your map instantly readable. Hover over any pin in the list and click the paint bucket icon. This opens up a world of options.
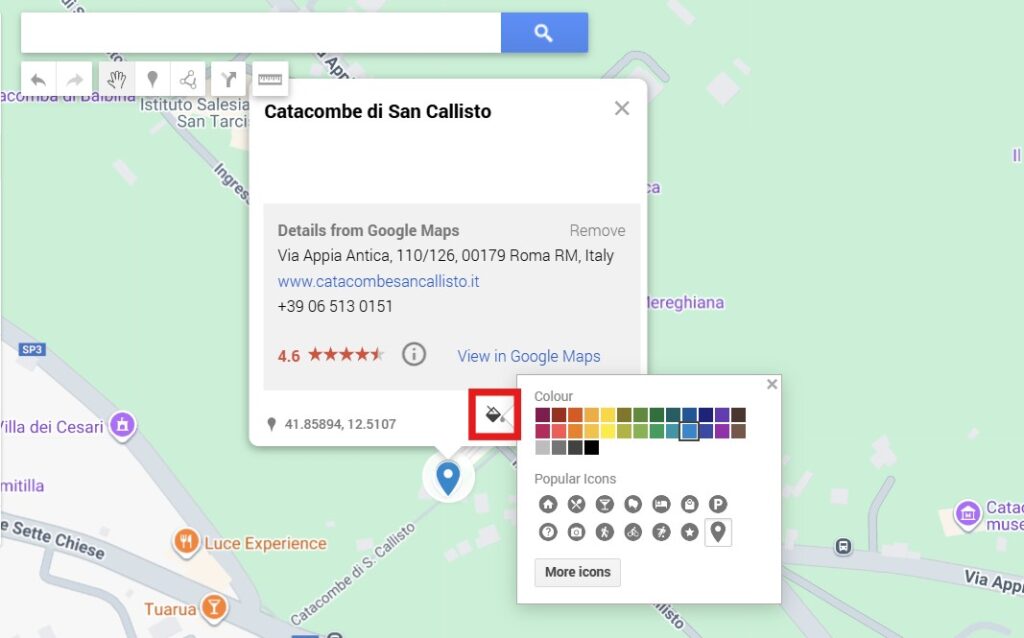
You can change the pin’s color and choose from hundreds of icons. I use a fork-and-knife icon for restaurants, a coffee cup for cafes, and a camera for photo spots. This visual coding lets you understand your map at a single glance.
For the truly dedicated, you can even click “Custom icon” to upload your own images. Want to use a restaurant’s logo as its pin? You can do that!
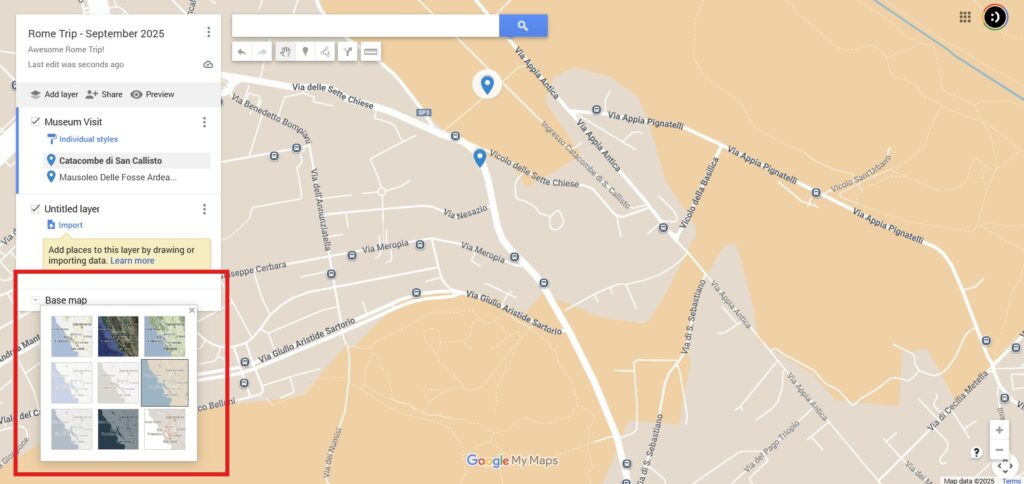
Finally, I recommend changing the base map. The default Google Map is often cluttered with icons for businesses you don’t care about. At the bottom of the left panel, click “Base map” and choose a simpler style like “Simple Atlas” or “Light Landmass.” This makes your custom pins pop.
Your Map in Your Pocket: Using Your Creation On the Go
All this planning pays off the moment you land. Here’s how to access your masterpiece on your phone.
Open the standard Google Maps app you use for navigation. Tap the “You” tab in the bottom menu. You might have to scroll a bit, but you’ll see a button for “Maps.” Tap that, and a list of all your custom My Maps will appear. Just select the one for your trip, and you’re in business.
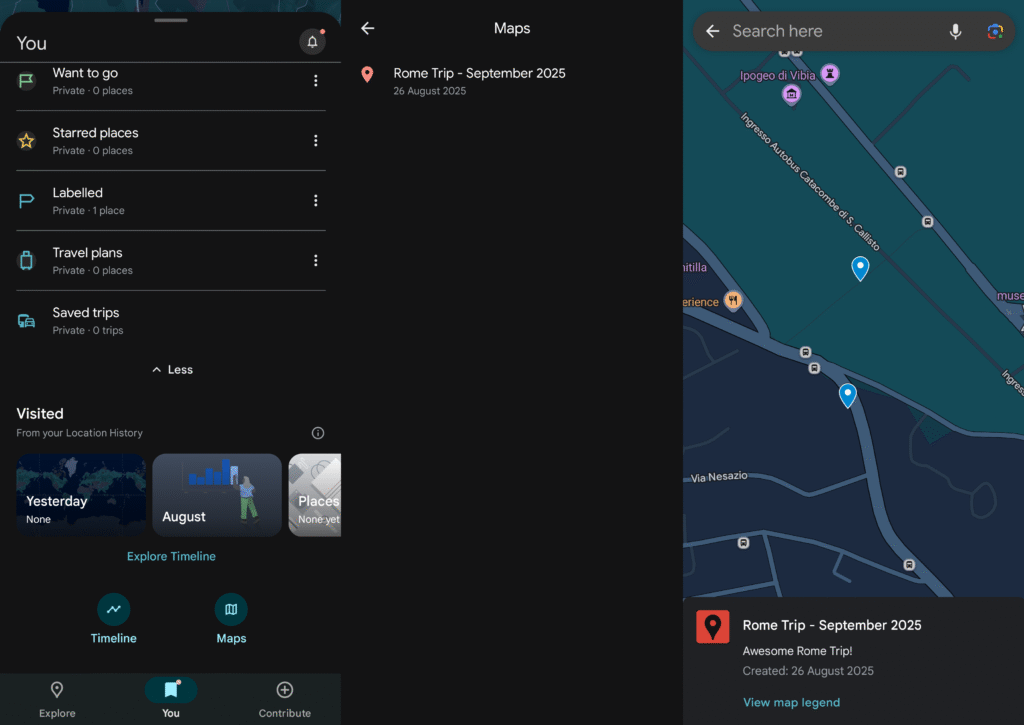
Now, you can see your location as a blue dot moving around your custom map. Tap any of your pins to see the details, and then tap the “Directions” button for instant, turn-by-turn navigation. It’s a seamless transition from planning to doing.
The Critical Caveat: The Truth About Offline Access
This is incredibly important, so please don’t skip this part. Google My Maps does not have a reliable, built-in offline feature. If you’re traveling abroad or in an area with spotty service, you can’t count on it working perfectly without an internet connection.
There is an unreliable workaround some people use called the “caching method.” This involves opening your map on Wi-Fi and zooming around the areas you’ll be visiting.
Then, you must not fully close the Google Maps app. The data might stay in your phone’s temporary memory.
I have to be honest: this is not a foolproof plan. The cache can clear itself at any time.
The Real Solution: The Two-Map Strategy
Here is the expert-level solution that I use on every single trip. It’s a two-pronged approach that gives you the best of both worlds.
- Your Custom My Map for Reference: Use your beautiful, personalized map to see what you want to do and where your points of interest are. It’s your visual guide.
- Standard Google Maps for Navigation: Use the main Google Maps app’s robust offline feature to download the entire city map for reliable navigation.
To do this, just go to the main Google Maps app, tap your profile picture, and select “Offline maps.” From there, tap “Select Your Own Map,” draw a box around the area you’ll be in, and hit “Download.” Now you’ll have reliable turn-by-turn directions, even in airplane mode.
Using this two-map strategy guarantees I can always find my way.
Sharing, Collaboration, and Final Thoughts
This method is fantastic for solo trips, but it’s even better for group travel.
In your map’s settings, click the “Share” button. You can send a link to your travel companions that allows them to either view or edit the map with you. Everyone can add their restaurant picks and must-see sights, creating a collaborative master plan.
Now, you might be wondering about other travel apps like Wanderlog or TripIt. They’re great tools!
TripIt (Android | iOS) is fantastic for automatically organizing flight and hotel confirmations from your email. Wanderlog (Android | iOS) is excellent for building a detailed, collaborative text-based itinerary.
But the reason this particularly helpful trick remains my go-to is its powerful visual approach. For people who think spatially, seeing everything on a map is more intuitive.
Plus, it’s free and already integrated into the navigation app you’re definitely going to be using anyway!
This simple yet powerful method transforms the stress of vacation planning into a fun, creative part of the journey itself.
For me, building the map is now part of the excitement. It has saved me countless hours of confusion and helped me discover amazing places I would have otherwise missed.
Give it a try for your next trip. Start plotting your points of interest, get creative with your icons, and see how a little visual organization can make your travels so much easier.