It’s a notification that strikes fear into the heart of every digital citizen: “Your account is almost out of space.”
For years, my Gmail account was my digital life. It held everything from decade-old conversations to important documents and treasured photos.
That free 15GB from Google, which once felt infinite, was suddenly a digital prison. I faced a terrible choice: start deleting precious memories or pay for more storage.
But then I found a third option, one that let me keep every single email and file. In the end, I unlocked 15GB more Gmail storage for free, and my primary inbox went from 80% full to less than 1%.
No tedious manual cleaning, no Google One subscription. It’s a simple solution that gives you a clean slate without losing a thing.
The Secret to Freeing Up Gmail Storage Without Deleting
The workaround is extremely simple: you create a second, free Gmail account to act as your personal archive. Then, you transfer every email from your original account to this new one!
Your original account becomes your active, day-to-day inbox, while your new account becomes a searchable, secure vault for all your old messages.
This process is about moving, not deleting. It’s a great method for freeing up Gmail storage while ensuring you never lose access to your history. Let’s walk through the steps.
Step 1: Back Up Your Files for Peace of Mind
 Before you move anything, it’s wise to create a backup. This is optional, but I highly recommend it. If you’ve spent years building your digital life, an extra copy provides peace of mind.
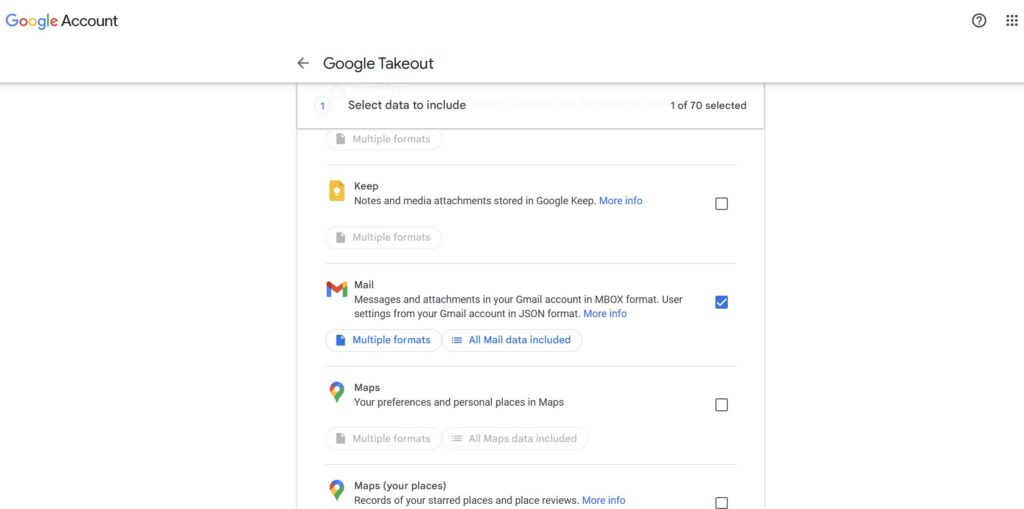
The best tool for this is Google Takeout. It allows you to download a complete archive of your data from Google Photos, Drive, and Gmail.
To do this, go to Google Takeout, select the products you want to export (I chose Gmail, Drive, and Photos), and simply follow the prompts. The process can take a while, depending on the amount of data.
For my test account with about 9,000 emails, the download link was ready in one and a half hours. Once you have this file saved on your computer or an external hard drive, you can proceed with confidence.
Step 2: Prepare Your Original Account for the Transfer
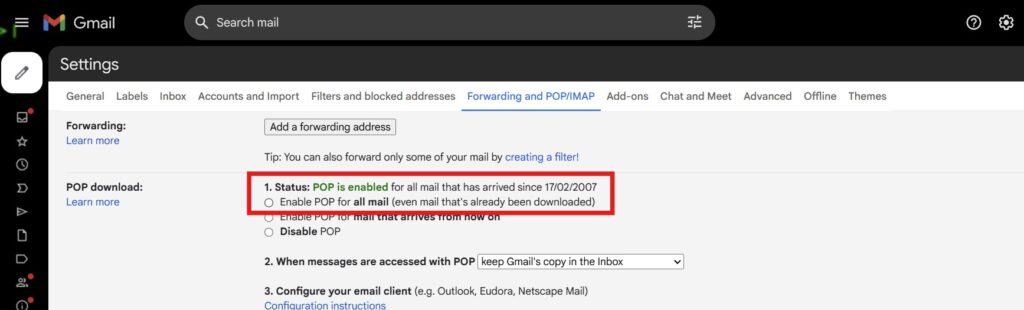
Now, you need to configure your original Gmail account to allow the transfer. This involves enabling a feature called POP (Post Office Protocol).
- Sign into your original Gmail account.
- Click the gear icon in the top right corner and select See all settings.
- Go to the Forwarding and POP/IMAP tab.
- In the “POP download” section, select Enable POP for all mail.
- A dropdown menu will appear that says, “When messages are accessed with POP.” This is the most important step for freeing up Gmail storage. Select Delete Gmail’s copy. This tells Gmail to remove the email from your original inbox after it has been safely copied to your new archive account.
- Click Save Changes.
Your original account is now ready to hand over its contents.
Step 3: How This Trick Unlocked 15GB More Gmail Storage for Free

It’s time to create your new archive account and begin the import process. This is where the magic happens.
- Go to Google and create a new, free Gmail account. I suggest a name like [yourname].archive@gmail.com to keep things clear.
- Sign in to your new archive account.
- Click the gear icon, select See all settings, and go to the Accounts and Import tab.
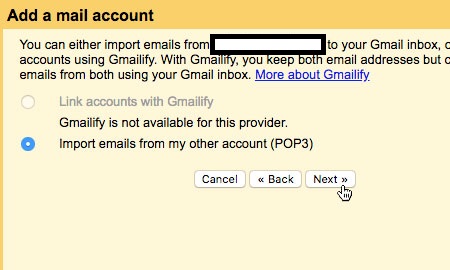
- Next to “Check mail from other accounts,” click Add a mail account.
- A pop-up window will appear. Enter the email address of your original Gmail account and click Next.
- Select Import emails from my other account (POP3) and click Next.

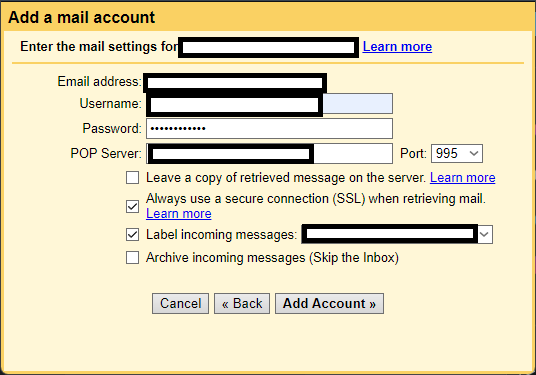
- Now, you’ll need to enter the password for your original account.
- Important Note on Passwords: If you use 2-Step Verification on your original account (and you should!), your regular password won’t work here. You’ll need to create a temporary App Password. To do this, visit myaccount.google.com/apppasswords, give the password a name like “Email Transfer,” and Google will generate a 16-digit code. Use this code in the password field. Google only shows you this code once, so copy it carefully.
- After entering the password, make sure the following settings are correct:
- POP Server: pop.gmail.com
- Port: 995

- Check these three boxes:
- Always use a secure connection (SSL) when retrieving mail. (For security)
- Label incoming messages. (This helps organize the imported emails in your new archive)
- Archive incoming messages (Skip the Inbox). (This keeps your new archive’s inbox clean)
- Click Add Account.
Step 4: The Transfer, the Cleanup, and the Reward
Once your accounts are synced, the email migration will begin automatically. Be patient, as this can take a long time. For my test account with 9,000 messages, the transfer took several hours to complete.
During this process, you’ll notice something wonderful happening in your original account. As emails are transferred, they will be moved to the Trash folder, and your storage meter will start to drop dramatically.
Once the transfer is complete (you’ll know because new emails stop appearing in your archive account), there are two final cleanup tasks:
- Check Your Drafts: Gmail does not transfer messages from your Drafts or Spam folders. Make sure you don’t have any important unfinished messages in your drafts. You can email them to yourself to finish later.
- Empty the Trash: In your original account, all the transferred emails are now in the Trash. Go to the Trash folder and click Empty Trash now. For a large number of emails, this can also take some time—it took about an hour for my 9,000 messages.
This is the most satisfying part of the process. Watching that storage usage drop to nearly zero is the moment you’ll realize you’ve successfully unlocked 15GB more Gmail storage for free.
Read More: I’ve Traveled Nonstop for Years: These 6 Gadgets Never Leave My Backpack
Step 5: Disconnect the Accounts for a Fresh Start
Your final step is to stop the automatic transfer process so your original account can function as a normal inbox again.
- Log back into your new archive account.
- Go to Settings > See all settings > Accounts and Import.
- Under “Check mail from other accounts,” find your original email address and click Delete.
- Confirm your choice.
Your accounts are now separate. Your original account is clean, empty, and ready for new messages. Your archive account holds all your old emails, which you can access and search anytime you need.
Your Newfound Digital Freedom
This method for freeing up Gmail storage is a way to completely reorganize your digital life. You get the benefit of a fast, uncluttered inbox while retaining secure access to every email you’ve ever sent or received.
So, if you’ve followed the steps correctly, congrats, you’ve effectively doubled your free storage without paying a dime or losing a single file. And that’s it!