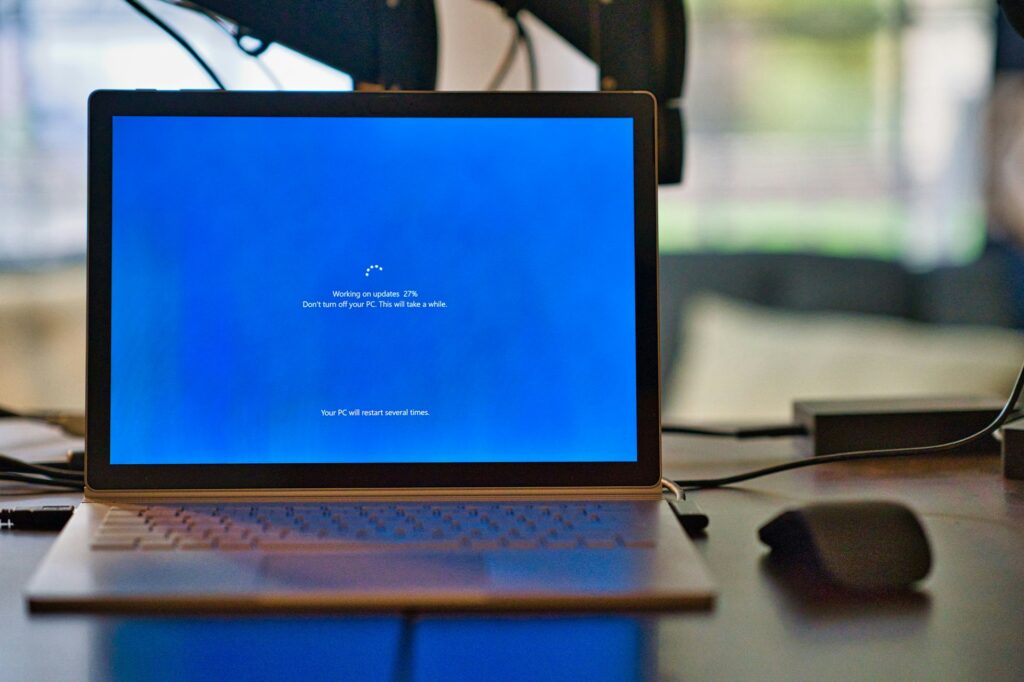
Time’s running out. On October 14, 2025, Microsoft will stop supporting Windows 10. That means no more security updates, which could leave your PC at risk. So, the smart move is to upgrade to Windows 11.
But when you try, you might see a message saying your PC isn’t compatible. This usually happens because of strict hardware rules, like needing a certain processor or a security chip called TPM 2.0.
Microsoft says you’ll need a new PC. But what if your current one still works just fine? Good news: there are trusted workarounds that let you upgrade to Windows 11 for free, even if your PC is “incompatible.”
This guide will show you exactly how to do it, so you can skip buying a new computer for now.
Contents
- 1 Why Your PC Is “Incompatible”
- 2 First, A Quick Hardware Check-Up
- 3 Option 1: The Easy Registry Tweak to Upgrade Your ‘Incompatible’ Windows 10 PC to Windows 11
- 4 Option 2: Use the Free Rufus Tool to Upgrade Your PC to Windows 11
- 5 A Quick Heads-Up About Really Old PCs and Windows 11 version 24H2
- 6 Will I Still Get Security Updates?
Why Your PC Is “Incompatible”
Microsoft’s checks look strict because they’re trying to keep Windows 11 more secure. The upgrade leans on newer hardware, so older machines can run into a few common blockers:
- Processor (CPU): Windows 11 only supports certain CPU models. If your PC is more than about five or six years old, it might not be on the list.
- TPM 2.0: That’s a small security chip used for hardware encryption. Lots of PCs have a TPM, but Windows 11 wants the newer 2.0 version.
- Secure Boot / UEFI: Your PC needs modern firmware (UEFI) and Secure Boot turned on to protect the startup process from malware.
Those are Microsoft’s official rules, but they aren’t the final word. There are ways to skip those checks when installing Windows 11. Let’s figure out which option fits your PC.
First, A Quick Hardware Check-Up
Before you start upgrading, it helps to know a bit about your PC’s setup. This will help you figure out the best way to upgrade.
- Check Your BIOS Mode and Secure Boot
- Press the Win Key + R to open the Run box.
- Type msinfo32 and press Enter. This opens the System Information utility.
- On the main “System Summary” page, look for BIOS Mode. It will say either UEFI or Legacy.
- While you’re here, look for Secure Boot State. It will likely say On, Off, or Unsupported.
- Check Your TPM Status
- Press the Windows Key + R again.
- Type tpm.msc and press Enter.
- If a TPM is found, the window will show its status and version under “TPM Manufacturer Information.” Look for the Specification Version, which will be 2.0 or 1.2.
- If it says “Compatible TPM cannot be found,” either your PC doesn’t have one, or it’s turned off in the BIOS.
Which Option Should You Pick?
Now that you know your BIOS mode and TPM status, here’s what to do next:
Option 1: If your BIOS mode is UEFI and you have a TPM (either 1.2 or 2.0), this is for mostly modern PCs that might fail the CPU check or don’t have TPM 2.0 exactly.
Option 2: If your BIOS mode is Legacy or the TPM check said you don’t have a TPM, this option works better for older PCs missing these key features.
Option 1: The Easy Registry Tweak to Upgrade Your ‘Incompatible’ Windows 10 PC to Windows 11
If your PC uses UEFI and has at least TPM 1.2, you just need a quick registry edit. This tells Windows 11 to skip the CPU and TPM 2.0 checks.
Step 1: Make a Small Change in the Windows Registry
First, you’ll make a small change to the Windows registry. Be careful and follow these instructions exactly.
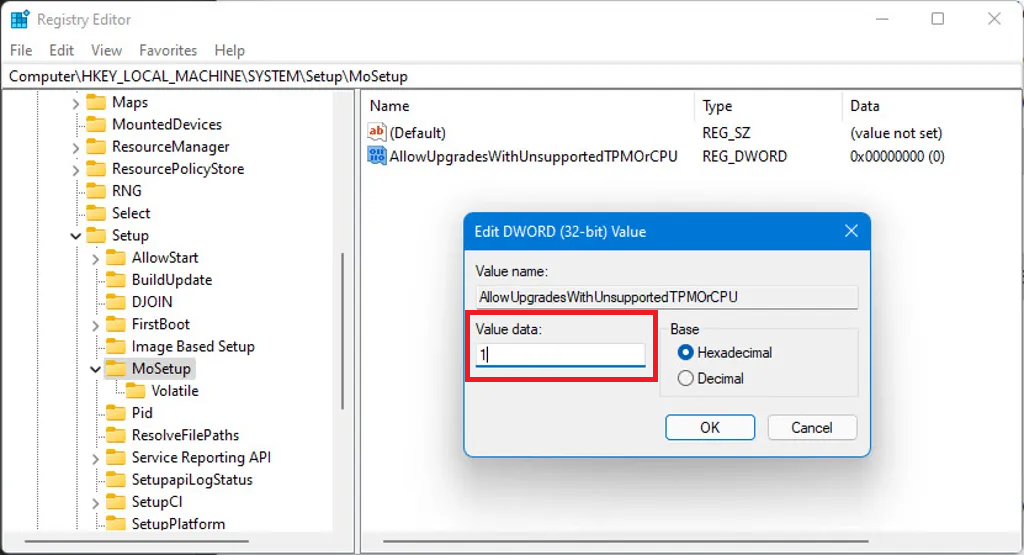
- Open the Start menu, type regedit, and open the Registry Editor.
- In the address bar at the top, paste this and press Enter: HKEY_LOCAL_MACHINE\SYSTEM\Setup\MoSetup
- If you don’t see the MoSetup folder, right-click on the Setup folder on the left, pick New > Key, and name it MoSetup.
- Click on MoSetup, then in the empty space on the right, right-click and choose New > DWORD (32-bit) Value.
- Name it exactly: AllowUpgradesWithUnsupportedTPMOrCPU
- Double-click this new value and change the number from 0 to 1, then click OK.
Now close the Registry Editor and restart your PC.
Step 2: Download the Windows 11 ISO
Head to the official Windows 11 download page. Scroll down to Download Windows 11 Disk Image (ISO) and download the file. It’s pretty big, so give it some time.
Step 3: Mount the ISO File
Once the download is complete, open File Explorer and find the ISO file (likely in your Downloads folder). Simply double-click the file. Windows will “mount” it as a virtual DVD drive with its own drive letter.
Step 4: Run Windows Setup
- Open the new virtual drive and double-click Setup.exe to start the installer.
- You’ll get a warning about unsupported hardware; just click Accept.
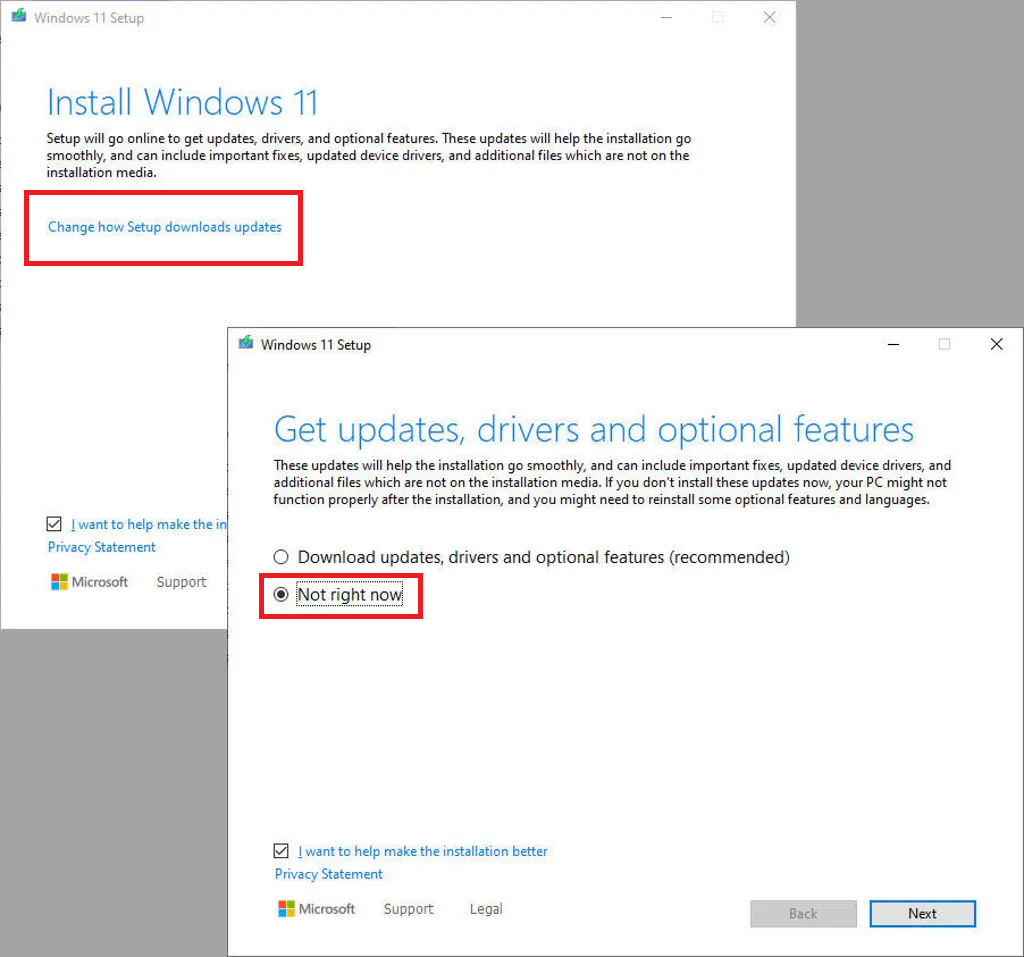
- Early on, click Change how setup downloads updates and choose Not right now—this helps the upgrade go smoothly.
- Follow the prompts. You’ll get to keep your files, apps, and settings, so it won’t wipe everything.
Also Read: Shocking Discovery: I Found a Tool That Exposes How Much You’re REALLY Tracked Online!
Option 2: Use the Free Rufus Tool to Upgrade Your PC to Windows 11
If your PC is older, doesn’t have a TPM, or uses legacy BIOS, you’ll need a different method. Rufus is a free, open-source tool that can make a special Windows 11 installer that skips all the hardware checks.
What You’ll Need:
- The Windows 11 ISO file (download it like in Option 1, Step 2)
- A USB flash drive with at least 16 GB of space (this will be wiped clean)
- The latest Rufus app (version 4.6 or newer)
Step 1: Download Rufus and the Windows 11 ISO
Download the Windows 11 ISO from Microsoft’s website. Then, go to the Rufus website and download the application.
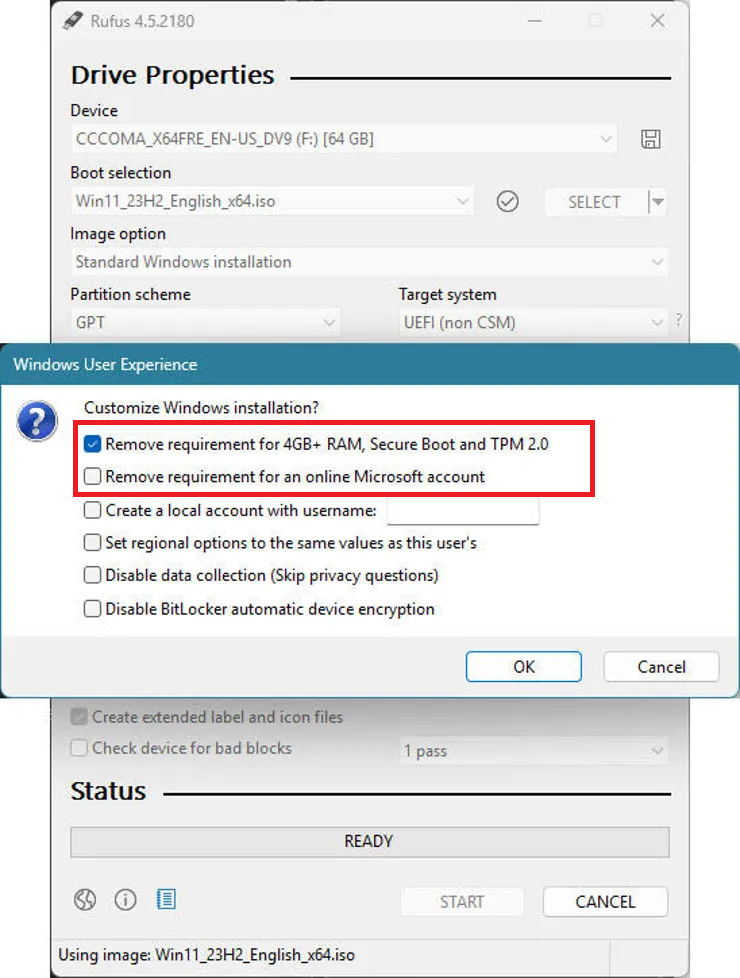
Step 2: Create the Modified USB Installer
- Plug in your USB drive.
- Open Rufus.
- Under “Device,” pick your USB drive.
- Click SELECT next to “Boot selection” and choose the Windows 11 ISO you downloaded.
- Leave everything else as is and click START.
- A new window called “Windows User Experience” will pop up. Make sure the box that says Remove requirement for 4GB+ RAM, Secure Boot, and TPM 2.0 is checked.
- You can also check the option to skip the online Microsoft account if you want a local account instead.
- Click OK, and Rufus will create your custom Windows 11 installer on the USB.
Step 3: Run the Upgrade from Within Windows 10
When Rufus finishes, open File Explorer and go to your USB drive.
Important: Don’t restart your PC or boot from the USB! While still in Windows 10, double-click Setup.exe on the USB to start the upgrade.
Just like in Option 1, if you see Change how setup downloads updates, pick Not right now to avoid errors.
Accept the warning about unsupported hardware and continue. Make sure to choose the option to keep your files and apps.
A Quick Heads-Up About Really Old PCs and Windows 11 version 24H2
With the Windows 11 24H2 update, Microsoft added a new strict block. This means really old CPUs that don’t have certain features called SSE4.2 and PopCnt won’t be able to run the latest Windows 11.
Most Intel processors made after 2009 and AMD ones after 2013 have these features, so they’re fine. But if your PC is older than that, even the workarounds we talked about might not let you install the newest Windows 11 version.
Will I Still Get Security Updates?
When you upgrade this way, Microsoft will warn you that your PC might not be supported and won’t get updates. That sounds scary, but in reality, lots of people who’ve done this kind of upgrade have kept getting regular security updates from Windows Update with no problems.
Officially, Microsoft doesn’t support these installs. But so far, they’ve been pretty forgiving.

By following these steps, you can upgrade your ‘incompatible’ Windows 10 PC to Windows 11 and keep using your current hardware longer. It’s a great way to get Windows 11 for free and stay protected after 2025. Just remember, always back up your important files before making big changes to your system.