Is your Apple TV feeling a bit slow? Maybe you’ve seen that annoying black screen flash when switching apps, or noticed movies looking weirdly smooth, like a soap opera.
Don’t worry, your Apple TV isn’t broken. It just means some of the default settings aren’t right for your setup.
The good news is that it’s an easy fix. In this guide, I’ll show you 13 settings I changed on my Apple TV that made a big difference.
After a few quick tweaks, you’ll get smoother menus, better picture quality, and an all-around better streaming experience.
Contents
- 1 A Cinematic Visual Overhaul
- 1.1 1. The Simple 4K SDR Fix That Stops Those Annoying Black Screen Flashes
- 1.2 2. Match Content Settings for That True Movie Theater Look
- 1.3 3. Sharpen Text and Menus with Full-Color 4:4:4 Chroma
- 1.4 4. Get More Accurate Colors by Optimizing HDMI Output
- 1.5 5. Use Your iPhone to Instantly Improve Color Accuracy
- 2 Immersive and Clear Audio
- 3 A Smarter, Friendlier Interface
- 3.1 7. Turn On High Contrast to See Exactly What You’re Selecting
- 3.2 8. Switch to Dark Mode to Make Nighttime Watching Easier on Your Eyes
- 3.3 9. Keep Watching While You Browse with Picture-in-Picture
- 3.4 10. Organize Your Home Screen with App Folders
- 3.5 11. Switch Your Keyboard to Grid Layout for Faster Typing
- 4 System Health and Digital Privacy
A Cinematic Visual Overhaul
Let’s kick things off with the stuff that makes the biggest difference. These first few settings will seriously level up your picture quality and make everything look and feel way smoother.
1. The Simple 4K SDR Fix That Stops Those Annoying Black Screen Flashes
Ever notice a quick black screen when you open certain apps like YouTube? That’s not a glitch. It’s your Apple TV switching between video formats.
By default, it tries to use HDR (High Dynamic Range) for everything, even menus. But most apps and the interface are actually made for SDR (Standard Dynamic Range), not HDR.
So every time you jump into an SDR app, your TV and Apple TV have to “talk” to each other and re-sync the video signal. That little pause is called an HDMI handshake. And it’s why your screen briefly goes black.
Here’s the fix: set your Apple TV’s default video format to 4K SDR. This keeps everything snappy and seamless when navigating menus or launching apps. Don’t worry, you’ll still get HDR when it actually matters, like during movies or shows that support it.
How to do it:
- Go to Settings > Video and Audio.
- Tap Format.
- Select 4K SDR.
No more awkward black flashes, and everything feels faster and smoother.
2. Match Content Settings for That True Movie Theater Look
Have you ever watched a movie that looked weirdly too smooth—almost like it was filmed on someone’s phone? That’s the dreaded “soap opera effect.” It happens when your TV tries to make everything look ultra-smooth by boosting the frame rate, even when it shouldn’t.
Most movies are shot at 24 frames per second (fps), but your Apple TV and TV might be playing them at 60fps or higher. That extra smoothness messes with how the movie is supposed to look.
Here’s how to fix it: turn on Match Frame Rate. This tells your Apple TV to play movies at their original frame rate—so you see them exactly how the director intended.
Also, turn on Match Dynamic Range to make sure colors stay accurate, without forcing SDR content into HDR (which can make things look washed-out or off). How to turn it on:
- Go to Settings > Video and Audio.
- Scroll down to Match Content.
- Toggle on Match Frame Rate and Match Dynamic Range.
Heads up: when you enable these, your screen will flash black briefly when starting a movie. That’s just your Apple TV switching to the correct settings. It takes a second, but it’s totally worth it for getting the picture just right.
3. Sharpen Text and Menus with Full-Color 4:4:4 Chroma
Do you notice that some text or app icons on your Apple TV look a little blurry or fuzzy, especially on colorful backgrounds? That’s not your eyes. It’s called chroma subsampling, a way of compressing color to save bandwidth.
Most video uses a compressed format (called 4:2:0), which works fine for movies and shows in motion. But for still things like menus, text, and icons, that compression can make things look a bit soft.
If your TV and HDMI cable support it, switching to 4:4:4 chroma sends full, uncompressed color info to your screen. The result? Crisp, clean menus and super sharp text that really pops. How to turn it on:
- Go to Settings > Video and Audio.
- Tap Chroma.
- Select 4:4:4.
⚠️ Tip: You’ll need a high-speed HDMI cable for this to work smoothly. Otherwise, you might run into screen flickering or signal issues.
Also See: I Can’t Believe I Missed These 5 Apple Security Features Before I Was Hacked
4. Get More Accurate Colors by Optimizing HDMI Output
Your Apple TV has a setting that controls how it sends color to your TV, and getting it right can make a big difference in picture quality.
Most video content is created using a color format called YCbCr, and most TVs are designed to work best with that format, too. But if your Apple TV is set to RGB, it has to convert the signal, and your TV might convert it back again. All that back-and-forth can mess with the image, making blacks look too dark or colors overly saturated.
To keep things simple, it’s best to set your Apple TV to output YCbCr directly. That way, the colors stay as close to the original as possible. How to do it:
- Go to Settings > Video and Audio.
- Select HDMI Output.
- Choose YCbCr.
🔍 Pro Tip: After switching to YCbCr, check a screen with a lot of white or gray. If things look a little green or yellow, your Apple TV might be running into a known tvOS bug. If that happens, just switch back to RGB High. It’s a solid backup and still looks great.
5. Use Your iPhone to Instantly Improve Color Accuracy
Most TVs don’t show colors perfectly right out of the box, and getting them professionally calibrated can cost a lot. But Apple has a clever (and free!) tool that uses your iPhone to do the job for you.
Here’s how it works. Your iPhone’s Face ID sensors read color patterns from your TV screen. Then, your Apple TV adjusts its output to make colors look more natural and true to life. All you need is:
- An iPhone with Face ID (iOS 14.5 or later)
- An Apple TV running tvOS 14.5 or later
How to do it:
- Go to Settings > Video and Audio > Calibration.
- Tap Color Balance and follow the steps on-screen.
- When prompted, hold your iPhone’s front camera close to the center of your TV screen.
That’s it! In a few seconds, you’ll get more accurate, natural-looking colors. No special tools or extra cost.
Immersive and Clear Audio
Picture is only half the experience. These audio tweaks will make a huge difference.
6. Make Dialogue Easier to Hear (Without Getting Blasted by Explosions)
Ever find yourself turning up the volume to hear what a character is saying, only to get hit with a way-too-loud explosion right after? Yeah, we’ve all been there. Thankfully, Apple has built-in tools that can fix this.
The “Enhance Dialogue” feature uses machine learning to make speech stand out from background noise, so voices are easier to hear.
If you want an even stronger effect, turn on “Voice Isolation” in the Accessibility settings. It focuses almost entirely on speech.
And to avoid those sudden volume spikes, “Reduce Loud Sounds” helps smooth out the audio so you’re not constantly reaching for the remote. How to turn these on:
- Go to Settings > Video and Audio.
- Scroll down and toggle on Enhance Dialogue and Reduce Loud Sounds.
- For extra clarity, go to Settings > Accessibility and turn on Voice Isolation.
With these on, you’ll actually be able to hear every word, without waking up the whole house.
Also Read: Don’t Wait 12 Years Like I Did: How Installing a VPN on My Smart TV Changed It All
A Smarter, Friendlier Interface
These next changes focus on quality-of-life improvements that make using your Apple TV faster and more enjoyable.
7. Turn On High Contrast to See Exactly What You’re Selecting
Find yourself clicking the wrong app because you can’t tell which one is actually highlighted? You’re not alone. The Apple TV’s home screen can be a bit hard to read, especially on big, bright displays.
Just turn on High Contrast. This setting adds a bold white border around the selected app, so it’s super clear what you’re about to open. It’s technically an accessibility feature, but honestly, it just makes navigation way easier for everyone. How to turn it on:
- Go to Settings > Accessibility > Display and Text Size.
- Tap Focus Style and choose High Contrast.
Once it’s on, you’ll never lose track of your selection again. No more opening the wrong app by accident.
8. Switch to Dark Mode to Make Nighttime Watching Easier on Your Eyes
Bright white menus can feel like a spotlight in a dark room, kind of harsh on your eyes, especially late at night. Dark Mode flips things around with a dark background and light text, making everything way easier to look at during those late-night binge sessions.
Plus, some studies say reducing blue light exposure at night might help you sleep better by boosting melatonin, your body’s natural sleep hormone. How to turn it on:
- Go to Settings > General > Appearance.
- Choose Dark.
- Or pick Automatic to have it switch between light and dark based on sunrise and sunset.
Your eyes will thank you.
9. Keep Watching While You Browse with Picture-in-Picture
Want to keep an eye on the game while you look for your next movie? Picture-in-Picture (PiP) lets you shrink a video into a small window that you can move around while you’re navigating other apps.
It’s a handy feature, but heads up, not every app supports it. It works well with Apple’s own apps and some, like Amazon Prime Video and Paramount+. Sadly, big names like Netflix and Hulu don’t support it yet. How to use Picture-in-Picture:
- While watching a video, tap (don’t click) the touchpad on your remote.
- Swipe up to bring up the playback controls.
- Click the Picture-in-Picture icon (it looks like a small box inside a bigger box).
Now you can multitask without missing a moment.
10. Organize Your Home Screen with App Folders
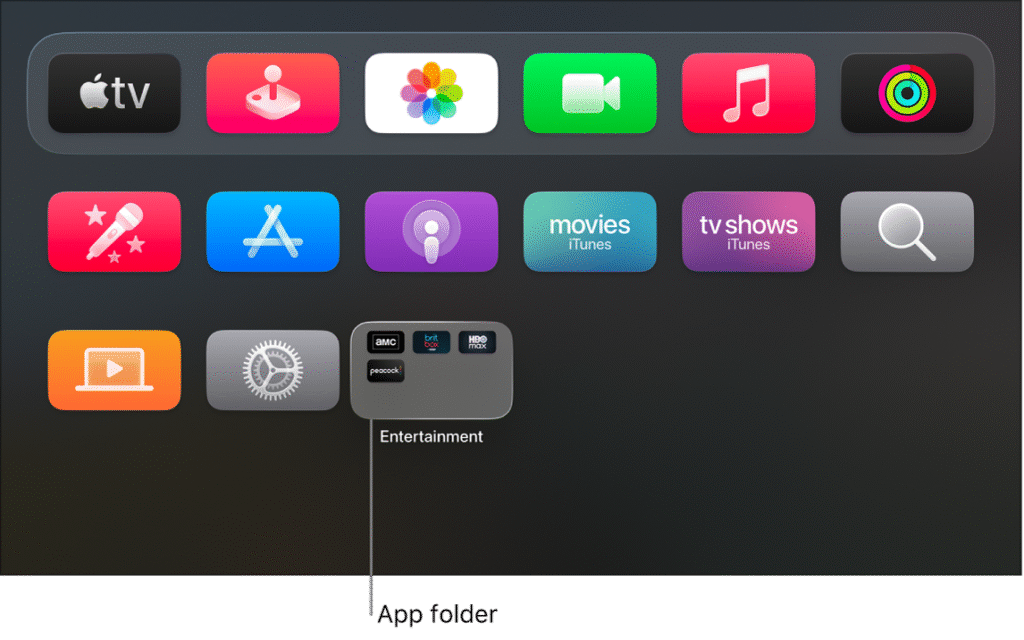
Is your Apple TV home screen a total mess of apps? Folders are the easiest way to tidy things up. Group apps by category, like “Streaming,” “Kids,” or “Live TV”, so everything’s neat and easy to find. It’ll save you time and make using your Apple TV way smoother. How to make a folder:
- Highlight an app and press and hold the Select button on your remote until the app starts jiggling.
- Press the Play/Pause button, then pick Move to Folder.
- Choose New Folder or add the app to one you’ve already made.
Simple, but a game-changer for keeping things organized.
11. Switch Your Keyboard to Grid Layout for Faster Typing
The default Apple TV keyboard feels slow and a bit clunky, right? Switching to the Grid layout puts the letters in a neat matrix, so you don’t have to swipe as much. It’s a huge time saver when you’re typing long movie titles or tricky passwords. How to switch it:
- Go to Settings > General > Keyboard Layout.
- Select Grid.
Typing just got a lot easier.
Also Check: I Found a Tool That Exposes How Much You’re REALLY Tracked Online
System Health and Digital Privacy
Finally, let’s cover two essential settings for maintenance and security.
12. Free Up Space by Offloading Apps Instead of Deleting Them
Apple TVs don’t have endless storage. Most start with just 64GB. When your storage gets full, things can slow down. Luckily, there’s a smart way to clear space called Offload.
Offloading removes the app itself but keeps all your settings and login info safe. Unlike deleting, you won’t lose any data. When you reinstall the app later, it’s like nothing changed. You can pick up right where you left off.
This is a great way to keep your Apple TV running smoothly without worrying about losing stuff. How to offload apps:
- Go to Settings > General > Manage Storage.
- Find an app you don’t use much and select the trash can icon next to it.
- Choose Offload to free up space but keep your data, or Delete to remove everything
Using this trick, along with the other 11 settings, really helped boost my Apple TV’s performance.
13. Bonus Tip: A 60-Second Privacy Check
Apple does collect some data to improve its services and show you personalized ads. But you’re in control. Spending just a minute reviewing your privacy settings lets you decide what to share and what to keep private. How to tweak your privacy settings:
- Go to Settings > General > Privacy.
- Turn OFF Share Apple TV Analytics.
- Turn OFF Improve Siri & Dictation.
- And make sure Allow Apps to Ask to Track is ON. This makes apps ask your permission before tracking you across other apps and websites.
By changing these 13 settings, you’ll make your Apple TV faster, prettier, and way easier to use. Enjoy your newly optimized device, and happy streaming!