Most people open Apple Calendar and just glance at the date. They think it’s a basic app and leave it at that.
But honestly, it’s more like a hidden productivity engine. It can keep your whole life organized, not just your appointments.
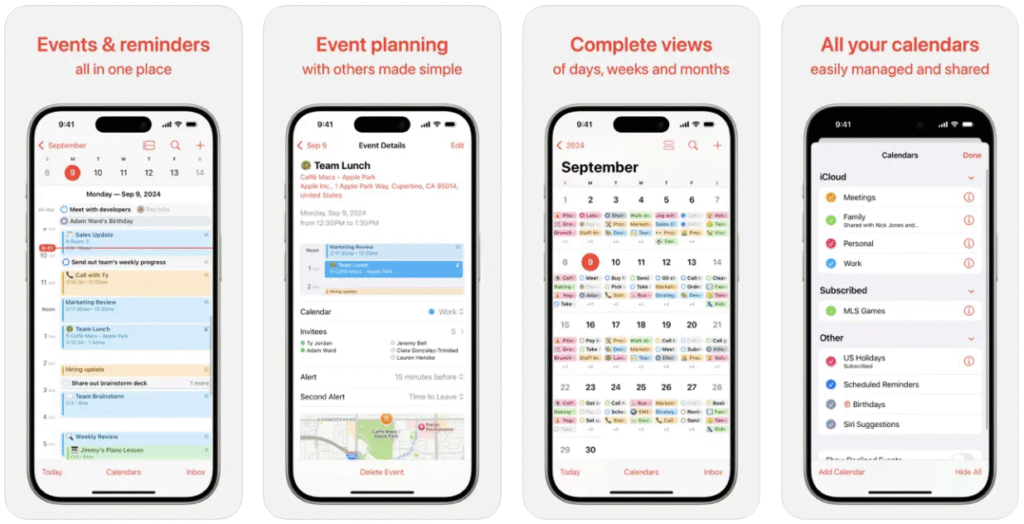
These simple Apple Calendar hacks go beyond just scheduling stuff. They turn your calendar from something you check passively into a tool that actually works for you. You just need to know a few tweaks and tricks.
In this guide, I’ll show you how to use Apple Calendar like someone who really knows their stuff. These hacks will change the way you plan your day and keep everything under control.
Contents
Unify Your Schedule: The First Critical Step
Your time is fragmented. You have a Google Calendar for work. You use an iCloud calendar for personal life. This split view makes planning impossible. The first hack is to bring everything into one place.
Add All Your Accounts
Apple Calendar is built to be a central hub. You can add nearly any other calendar account. This includes Google, Outlook, and Microsoft Exchange.
On an iPhone or iPad:
- Open the Settings app.
- Scroll down and tap Apps, then Calendar.
- Tap Accounts, then Add Account.
- Choose your service, like Google, and sign in.
On a Mac:
- Open the Calendar app.
- Click Calendar in the top menu bar.
- Select Add Account.
- Choose your provider and follow the prompts.
Now, all your events from all your accounts appear in one app!
Also Read: You’re Using Apple Notes All Wrong: 20 Hidden Apple Notes Tricks That Make Life So Much Easier
iCloud Sync
For your Apple devices, iCloud is the glue. It keeps your iPhone, Mac, and iPad in perfect harmony. You must ensure it is enabled.
On your iPhone, go to Settings > iCloud. Tap See All and make sure Calendars is toggled on. On a Mac, find this in System Settings > iCloud.
Sometimes, syncs can fail, especially after an update. If your Mac and iPhone are not matching, here is the fix.
On your iPhone, go to Settings > Apps > Calendar > Sync. Change the setting from “All Events” to “Events 1 Month Back.” Wait a minute, then change it back to “All Events.” This forces a fresh sync from the server.
Organize with Color
Do not use just one calendar for everything. This creates visual noise. Instead, create separate calendars for each part of your life.
On a Mac, go to File > New Calendar. On iPhone, tap Calendars at the bottom, then Add Calendar.
Name them “Work,” “Personal,” “Family,” or “Projects.” Assign each a distinct color.
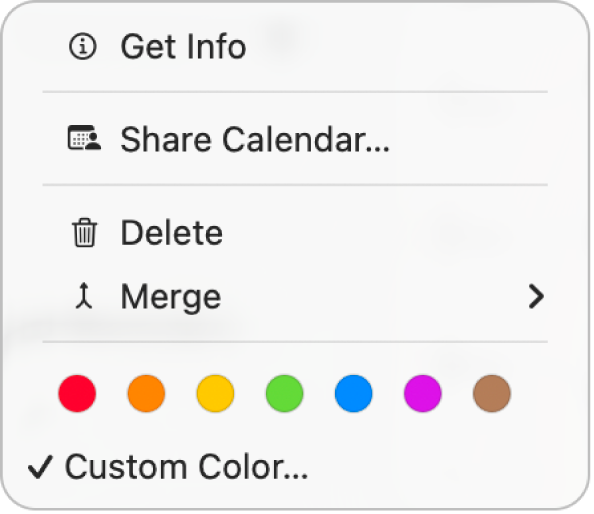
This simple visual sorting is one of the best Apple Calendar tips. You can see your day’s balance at a glance.
This color-coding is also the secret foundation for an automation hack we will cover later.
Also See: I Changed These 13 Settings on My Apple TV and Now It Runs Super Fast Like a Brand New Device
Change Your View: Hidden Apple Calendar Tips
Default views are often limiting. You need to see the right amount of information. These hidden gestures and settings give you full control.
Unlock the Hidden Weekly View
The iPhone app does not show a “Week” button. This frustrates many users. But the view is there. It is just hidden.
Open the Calendar app. Go to the Day or Month view. Now, simply rotate your iPhone sideways. A beautiful landscape-mode weekly view will appear. This view shows a full 5-day or 7-day grid. It is perfect for planning your week.
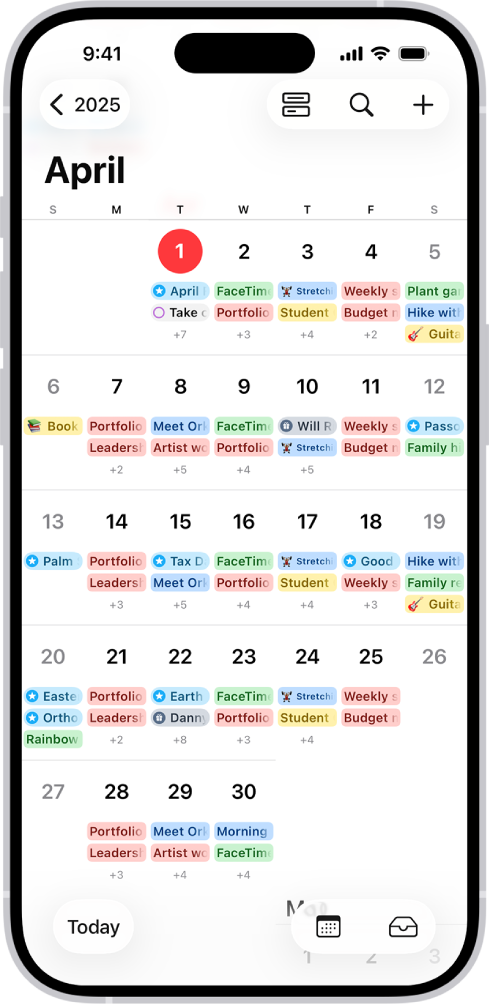
Pinch-to-Zoom in Month View (iOS 18 and Later)
For years, the Month view on iPhone was not very useful. It just showed tiny dots on busy days. The iOS 18 update finally fixed this.
It introduces a new pinch-to-zoom gesture. You can now zoom in and out on the Month view. This reveals different levels of detail:
- Zoomed Out (Compact): The classic view with dots.
- Zoom Out 1 (Stacked): Shows colored bars. You can see how busy a day is.
- Zoom Out 2 (Event Titles): You can now read event titles.
- Zoom Out 3 (Titles and Times): See full event details for the day.
This feature alone is one of the best Apple Calendar hacks. It makes the Month view truly functional.
The “Time to Leave” Alert
This hack turns your calendar from a passive list into a smart assistant. A normal alert is static. It reminds you “15 minutes before” an event.
A “Time to Leave” alert is dynamic. It calculates your departure time for you. It checks your current location. It checks the event’s location. It watches live traffic and transit data. It then sends you a notification at the exact moment you need to walk out the door.
How to Set It Up
This feature requires three things to be enabled.
- Add a Location: When you create an event, you must enter a full street address in the “Location” field.
- Enable the Alert: Go to Settings > Apps > Calendar > Default Alert Times. Toggle Time to Leave to ON.
- Allow Location Access: This alert needs your location. Go to Settings > Privacy & Security > Location Services. Find Calendar and allow access. Make sure Precise Location is turned on.
You will never be late for a meeting again. Your calendar will simply tell you when to go.
Task-Time Fusion with Reminders
This is the biggest update to Apple’s productivity suite in years. It solves a classic planning problem. Where do you put your to-do items?
Do you put “Write Report” on a to-do list (Reminders)? Or do you block 2:00 PM to 4:00 PM on your schedule (Calendar)? Now, you do both.
Apple Calendar now integrates Apple Reminders directly. You can see, create, and complete your tasks from inside your calendar.
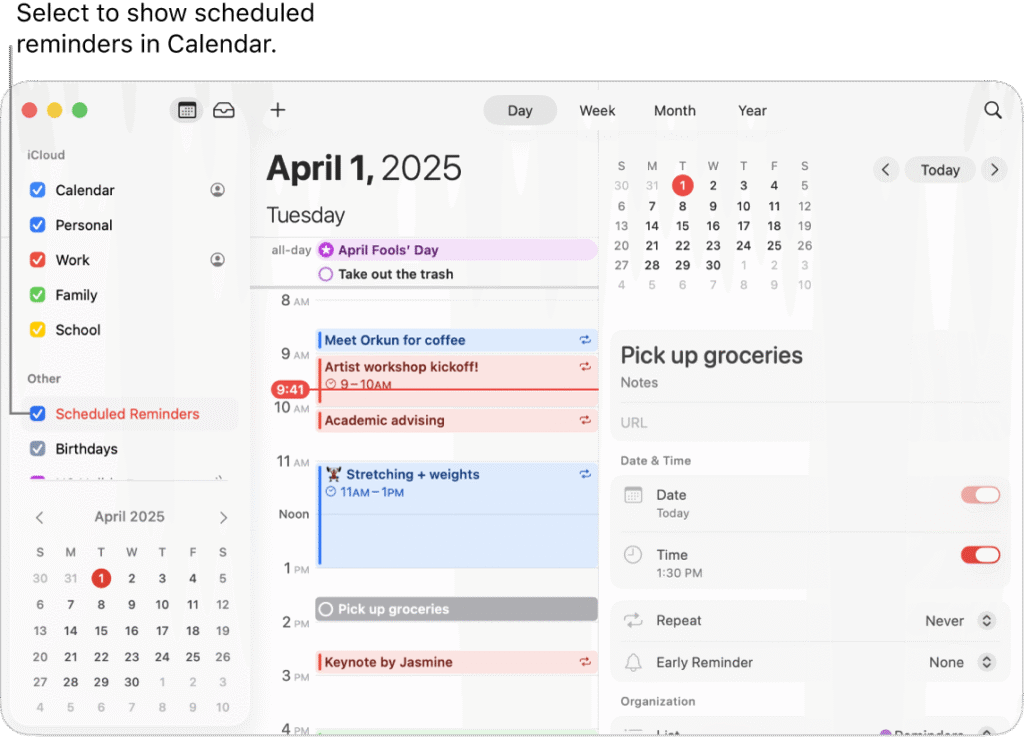
See Your Tasks in Context
This feature places your tasks at the specific time they are due. This lets you see your to-dos in the context of your available time.
- To View: On your iPhone, tap Calendars at the bottom of the screen. Check the box for Scheduled Reminders. On a Mac, find this checkbox in the calendar list on the left.
- To Create: Tap the + button to make a new entry. You now have two options: “New Event” or “New Reminder”.
- To Complete: When you finish a task, just tap the circle next to it. You can do this right from the calendar view.
This is a minimalist’s dream. It gives you one app for time-blocking and task management.
Is It Too Cluttered?
Some users find this new feature clutters their view. They have daily reminders that they do not want to see on their calendar.
The solution is simple. This feature is 100% optional. If you feel overwhelmed, just tap Calendars again. Uncheck Scheduled Reminders. All your tasks will instantly disappear from the calendar.
They are still safe in the Reminders app. You have complete control.
Automate Your Life with Focus Filters
A Focus Filter connects your calendars to a specific Focus mode. When you activate a mode, your calendar automatically hides and shows the right calendars.
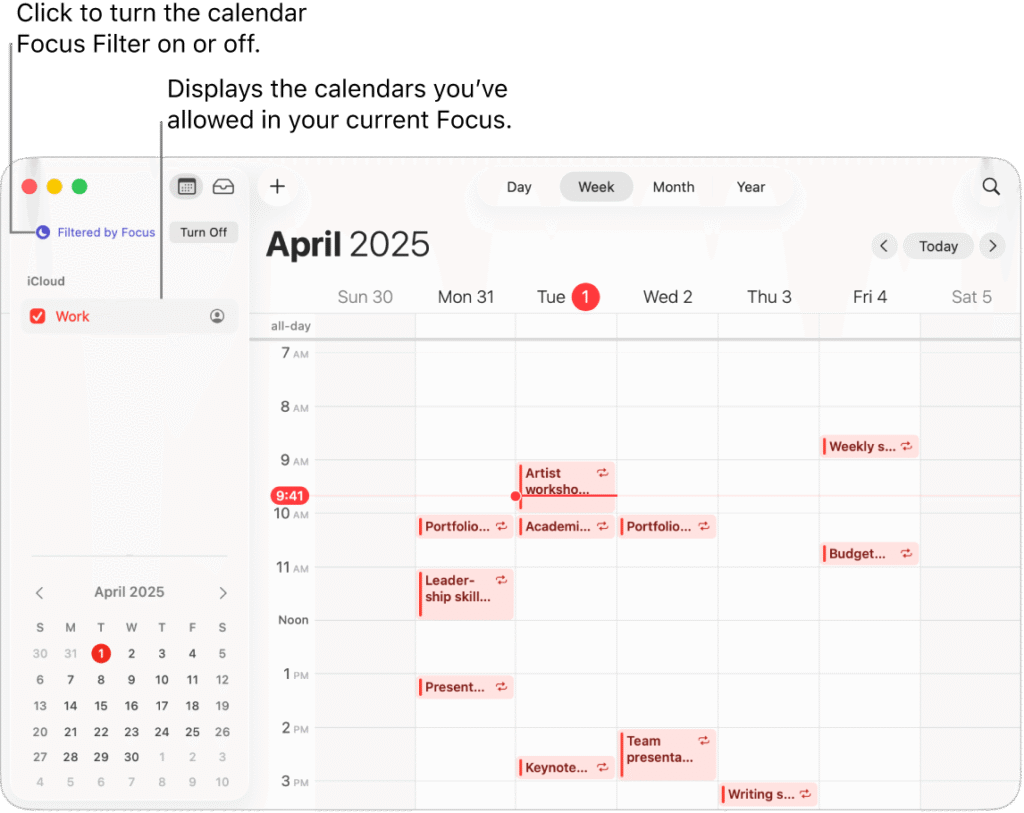
This helps you create boundaries between work and life. It uses the “Focus” modes on your iPhone and Mac.
Imagine this:
- You turn on your “Work” Focus. Your “Personal” and “Family” calendars instantly disappear. You only see your work schedule.
- At 5:00 PM, you turn on your “Personal” Focus. Your “Work” calendar vanishes. You are now free from work notifications and events.
This is the payoff for organizing your calendars by color.
How to Set It Up
- Go to Settings > Focus.
- Tap on a Focus mode, like Work.
- Scroll down to Focus Filters and tap Add Filter.
- Choose Calendar.
- Select only the calendars you want to see during your “Work” focus.
- Tap Add.
Repeat this process for your “Personal” or “Do Not Disturb” modes. This automation removes distraction. It helps you be fully present in work, or fully disengaged from it.
Master Time Zones for Travel
Forgetting a time zone change can cause missed flights or meetings. Apple Calendar has two powerful features to manage this. Most people confuse them.
Feature 1: Time Zone Override
This feature changes your entire calendar’s view. It shows you what your schedule looks like in a different time zone.
- Path: Settings > Apps > Calendar > Time Zone Override.
- Use Case: Planning a trip. You live in New York. You are planning a trip to Los Angeles next week. Turn on “Time Zone Override” and set it to “Los Angeles.” Your calendar will now show all your meetings in Pacific Time. You can schedule new events with confidence!
Feature 2: “Floating” Time Zone
This feature anchors a single event to the same clock time. It does not matter where you are in the world.

- Path: You must create this on a Mac. Double-click an event. Click the time and select Floating from the time zone menu.
- Use Case: Maintaining habits. You have an “8:00 AM Morning Run” event. If you use a normal time, it will shift when you travel. A floating event will always appear at 8:00 AM local time, whether you are in London or Tokyo.
This table explains the difference.
Setting
What It Does
Best For (Example)
Time Zone Override
Changes your entire calendar’s view to a new time zone.
Planning a trip: See your whole schedule in your destination’s time.
“Floating” Time Zone
Locks a single event to the same clock time, always.
Maintaining habits: Your “8:00 AM Gym” event always appears at 8:00 AM local time.
These are some of the most advanced Apple Calendar tips for travelers.
You may like: The Secret ‘3-Word Rule’ That Made My ChatGPT-5 Responses 10x Better (Try These 10 Tested Prompts)
More Simple Apple Calendar Hacks
Here are a few more quick Apple Calendar tips to improve your workflow.
Use Natural Language
You do not need to fill out every field. When you create a new event, just type in plain English.
- “Lunch with Andrew at 12 tomorrow”
- “Staff Meeting Friday 2pm-3pm”
- “Movie tonight at 7pm”
- “Plant cranberries with kids in the backyard on Sunday morning.”
The calendar will parse your sentence. It will fill in the title, date, and time fields automatically. You can even do this from your Mac’s Spotlight search bar (Command-Space).
Drag and Drop Your Work
Your calendar works with other apps.
- Drag an Email: Drag an email from Apple Mail onto the Calendar app icon. It will create a new event. The email subject becomes the title.
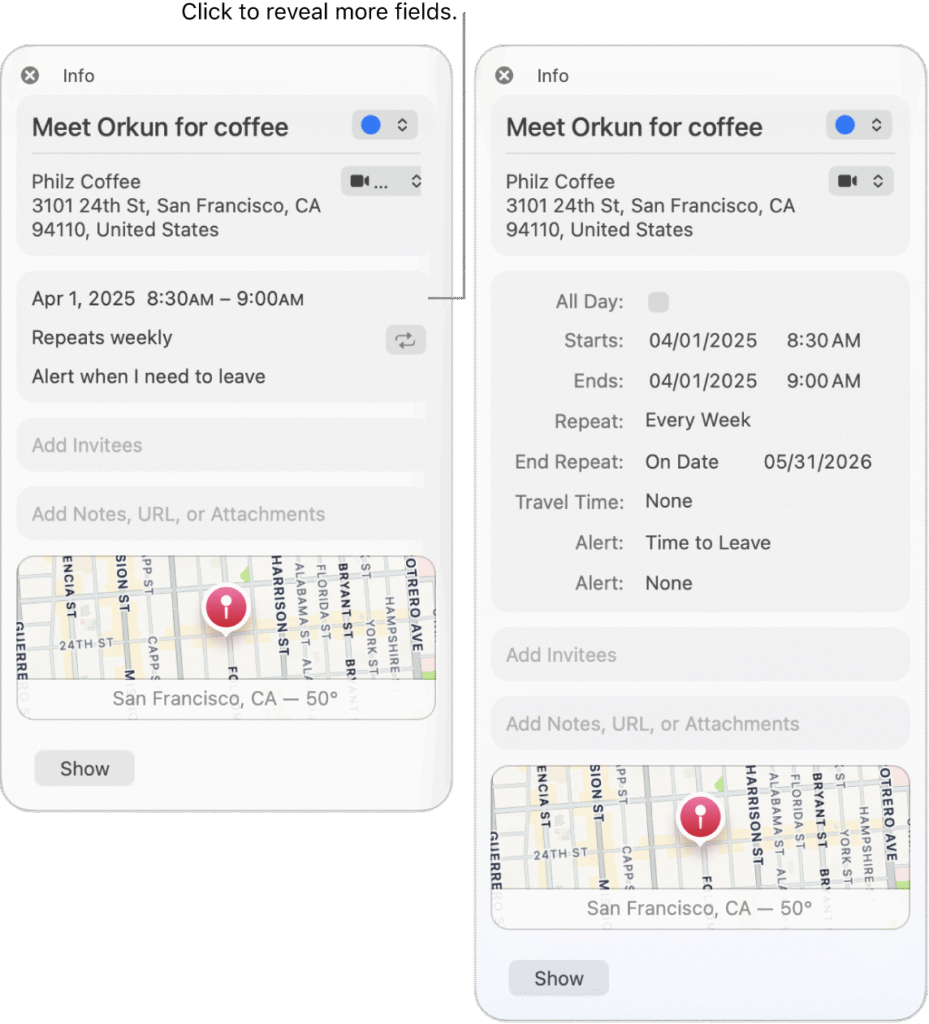
- Attach a File: Are you discussing a report in a meeting? Double-click the event. Click Add Notes, URL, or Attachments. You can add the PDF or document right to the event. Now your agenda is in the meeting invite.
Add Holiday Calendars
Your calendar can show you holidays for any region. This is great for working with international teams.
On a Mac, go to File > New Holiday Calendar. You can add holidays for any country. These are “subscription” calendars, so they update automatically.
Video Guide: Apple Calendar Tips You’re NOT Using 🔥📆 (iPhone 📱, iPad ✨, Mac 💻)
Final Thoughts
I hope these simple hacks and tips help you get the most out of Apple Calendar!
Start by unifying your accounts. Then, try one new hack each week. Master the “Time to Leave” alert. Set up your Focus Filters. Integrate your Reminders.
These small changes will fundamentally change how you plan your day.
Let me know in the comments if you have any other questions. Or tell me which Apple app you’d like me to cover next!